6/14/15
How to Make Black Forest Cake
Layers of cream, poached cherries and rich dim chocolate make this conventional German Black Forest cake a completely tasty, liberal and show-halting creation. This wanton cake tastes just as unimaginable as it looks and is ensured to awe even the hardest of faultfinders. This thump out excellent may look complex, yet you can figure out how to make it with this clear formula. This Black Forest cake tastes as good as it looks.
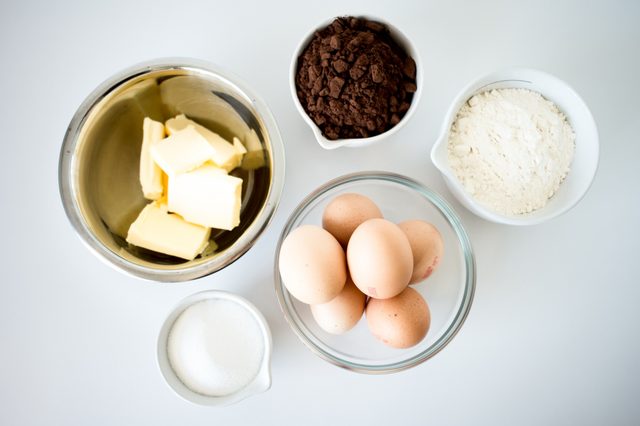
Ingredients: For the Poached Cherries
1/2 cup superfine (caster) sugar
1/2 cup water
1 pound / 450 grams fresh or frozen pitted cherries, plus extra for decorating
6 tablespoons Kirsch liqueur, optional
Ingredients: For the Cream Filling
10.2 fluid ounces / 300 milliliters heavy cream
3 tablespoons powdered (icing) sugar, plus extra for decorating
Ingredients: For the Ganache
3.5 ounces / 100 grams dark chocolate, chopped, plus extra for decorating
1/2 cup heavy cream
Step 1: Measuring the Ingredients
Baking is a science, so carefully measure out all of your ingredients beforehand for the best results.
Step 2: Preparing the Pans
Heat the oven to 335 F / 170 C. Grease and line two 7-inch / 18-centimeter round cake tins and set aside.
Tip
Alternatively, you can use a 2-by-7-inch / 18-centimeter cake tin and slice the cake in half before assembly.

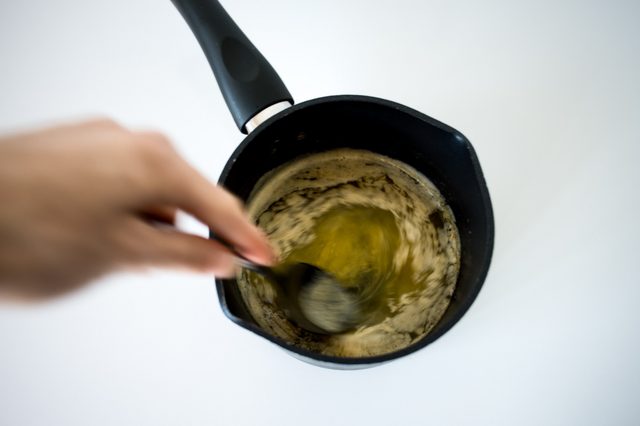
Step 3: Melting the Butter
In a small saucepan set over low heat, melt together the butter and vanilla extract. Set this mixture aside to cool.
Step 4: Combining the Eggs and Sugar
Place the sugar and eggs in a large bowl. With an electric hand mixer, whisk them together on a low speed to just combine.

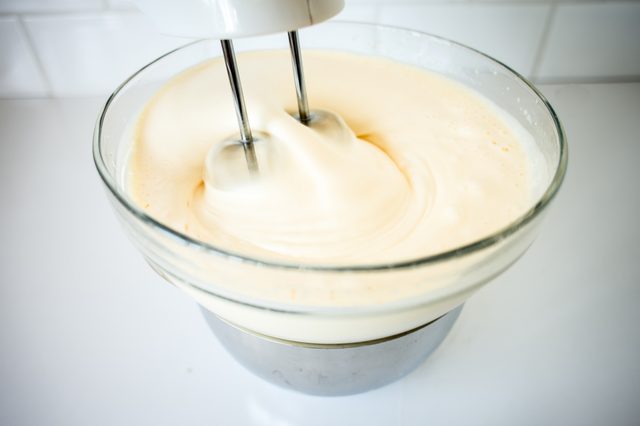
Step 5: Whisking the Eggs and Sugar Over Heat
Set the egg mixture over a pan half-filled with boiling water. Continue to whisk on low speed for 3 minutes, and then increase the speed to medium and whisk the mixture until it is pale and tripled in volume.
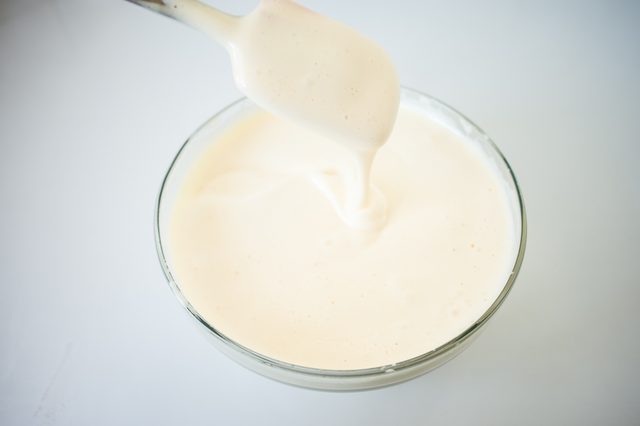
Step 6: Cooling the Egg Mixture
Remove the bowl from above the hot water, and continue to whisk until the mixture has cooled to room temperature -- about 3 to 4 minutes. The mixture will be thick and leave a ribbon trail when the beaters are lifted out of the bowl.
Step 7: Adding the Melted Butter and Flour
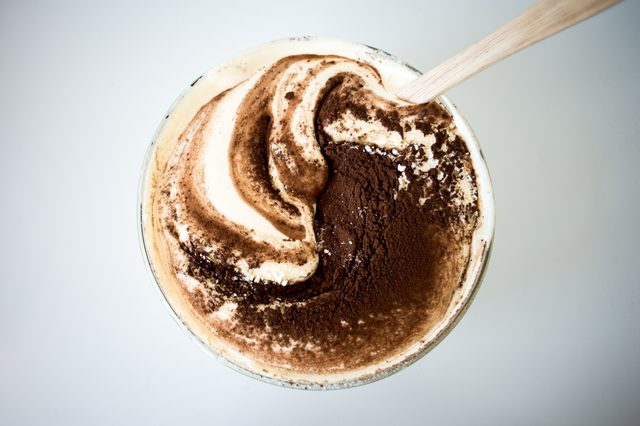
Pour the melted butter down the sides of the bowl, and gently fold it in. Sift in the flour and cocoa powder, and gently fold the batter again until the flour is just incorporated.
Warning
Be careful not to over-fold the mixture here, as it will lose all of its air.
Step 8: Baking and Cooling
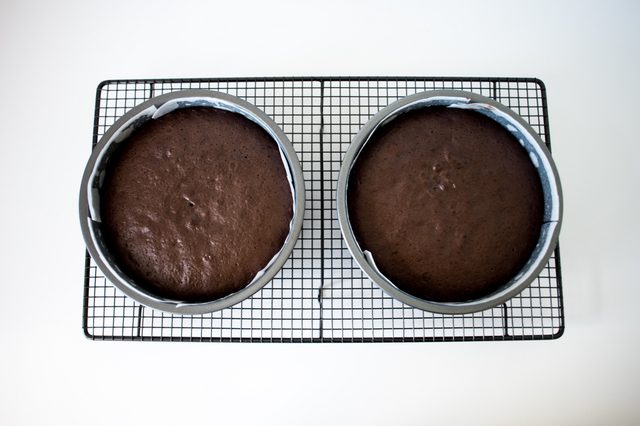
Divide the mixture evenly between the cake tins, and bake in the oven for 25 to 35 minutes or until the cake rises and springs back when gently pressed in the center. Leave the cakes to cool in their tins before inverting onto a wire rack.
Step 9: Making the Poached Cherries
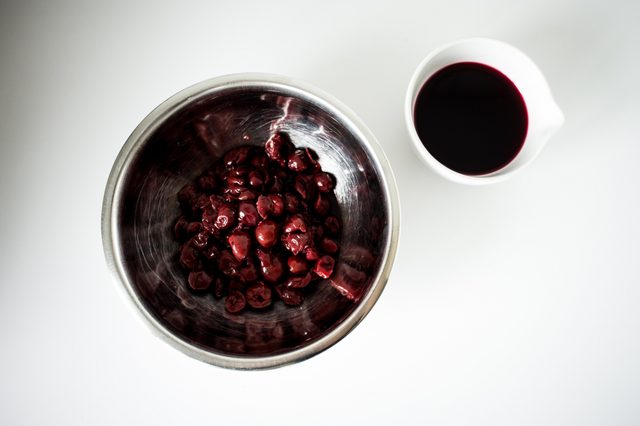
While the cakes are cooling, make the poached cherries. Heat the sugar and water in a small saucepan set over low heat until the sugar has dissolved. Add the Kirsch liqueur and cherries, and bring the mixture to a gentle simmer. Continue to cook for 3 to 4 minutes or until the cherries have absorbed some of the syrup and are puffed and tender. Strain the cherries and the syrup into two separate bowls, and set both aside to cool.
Step 10: Making the Chocolate Ganache
To make the chocolate ganache, place the chopped chocolate in a small bowl. In a small saucepan set over medium heat, bring the cream to a gentle simmer. Pour the hot cream into the bowl with the chocolate. Let sit for 1 minute before gently stirring to combine.

Step 11: Making the Cream Filling
For the cream filling, add the cream and powdered sugar into a large bowl and whisk until the cream begins to just hold its shape.

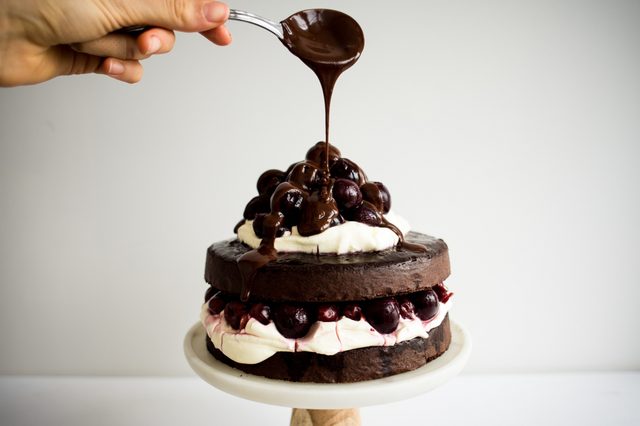
Step 12: Glazing the Cake Layers
To assemble the cake, place the first cake layer on a plate or stand and brush it generously with cherry syrup.

Step 13: Filling With Cream and Cherries
Generously spoon 3 tablespoons of the cream on top the first cake layer, leaving a slight border around the edge. Arrange the poached cherries on top of the cream.

Step 14: Top With the Second Cake Layer
Add the second cake layer. Brush again with cherry syrup, and then pile on the cream and extra cherries.

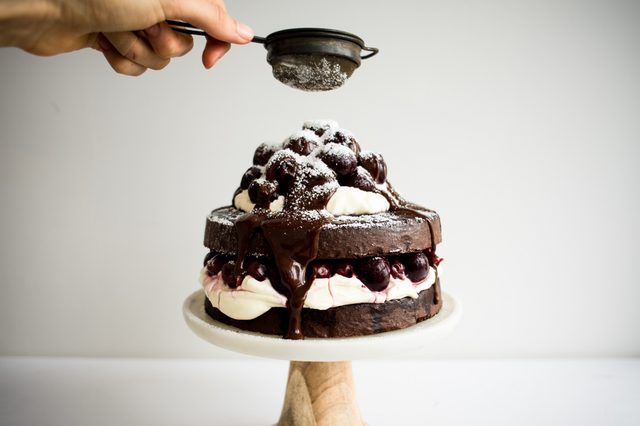
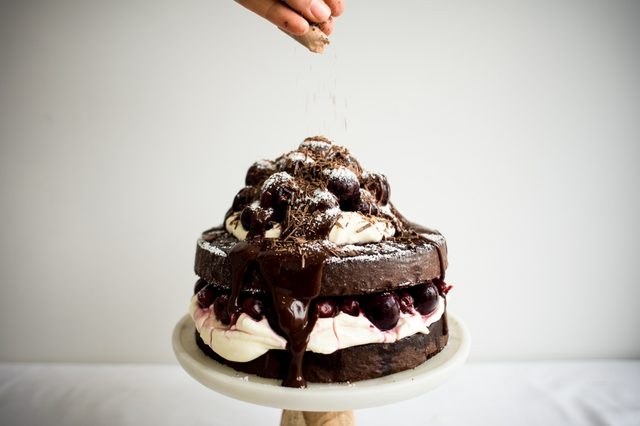
Step 15: Decorating the Cake
Finish the cake by pouring on the chocolate ganache, adding a generous dusting of powdered sugar and sprinkling with extra shaved chocolate.
Step 16: Serving
Chill the cake for 1 hour to make it easier to slice, taking it out of the refrigerator 20 minutes before you plan on serving it.

Chill the cake before serving to make it easier to slice.
5/24/15
Sautéed sea plant
Edible sea vegetable or (“sea plant”) miyeok (미역) is a very healthy food that contains high levels of calcium, iodine, vitamins, and other minerals. It is called “wakame” in Japanese, “qundaicai” in Chinese, and “fougère des mer” in French. In Korean cuisine, it’s usually used for soup or salads.
Julgi (줄기) is “stem” in Korean, so miyeok julgi bokkeum means “sautéed sea plant stems.” Many people like the texture of the miyeok stems because they are chewy and a little crunchy. This side dish is one of the most popular Korean dosirak side dishes.
You can get this main ingredient “miyeok julgi” at a Korean grocery store. It’s usually sold in a package preserved with lots of sea salt.
Ingredients
Miyeok stems (1 pound package), onion, garlic, corn syrup (or sugar, honey), soy sauce, onion, sesame oil, roasted sesame seeds, and artificial crabmeat (optional).
Directions
- Open a package of miyeok julgi (1 pound) with scissors. Rinse it in cold water a couple of times until all the salt is gone. Soak it in cold water for 10 minutes.


- Boil about 8 cups of water in a pot.
- Drain the miyeok julgi and put them into a pot of boiling water.

- Blanch them for 20 seconds.
- Rinse in cold water, strain, cut them into bite size pieces, and set aside.
- Mince 2 cloves of garlic and slice half of a medium-sized onion. Set them aside.
- Split 3 sticks of crabmeat lengthwise into threads with your fingers. Cut them into bite size pieces and set aside.
*tip: sometimes, if some miyeok julgi is not shredded thinly, split thinly with your fingers - Heat up a pan over medium high heat. Add some vegetable oil.
- Add the minced garlic and sliced onion. Stir it with a wooden spoon for 10 seconds, and then add miyeok julgi.

- Keep stirring for about 3 minutes.
- Add 1 tbs soy sauce, 2 ts corn syrup (mulyeot), and the crabmeat threads. Sautée another minute.

- Turn the heat off and add 2 ts of sesame oil.

Transfer to a serving plate and sprinkle some sesame seeds on top.

Sweet pancakes with brown sugar syrup filling
Hotteok is a flour dough pancake filled with sugar syrup inside. It’s one of the most popular street snacks in Korea.
Ok, now it’s time for me to release my hotteok recipe!
I used to make hotteok for my children. How often? So many times! When they came home from school, I would surprise them with my hotteok. I never made it before they came. I prepared some well-fermented dough and the brown sugar mixture. That’s all! Once they entered the home, I said, “Wash your hands and come back to the kitchen! Hotteok will be ready~” with big smile. My children were so happy and excited!
A glass of milk and hot hot hotteok with sizzling golden syrup! Wouldn’t you like it? Yes, children love it! If you want to entertain your children, wait for them with the preparation just as I did.
I make hotteok for myself and my friends these days. Where are my little children!!
I sometimes miss the old times. They are already grownups and live far away from me.
Serve or eat hotteok right after you make it. If someone gives me cold hotteok, I will feel insulted. : ) I will refuse to eat it and save my empty stomach for kimchi and rice! lol
Ingredients
Flour, water, dry yeast, salt, vegetable oil, sugar, brown sugar, walnuts, and cinnamon powder.
Directions
Make hotteok dough:
- Place 1 cup of lukewarm water into a mixing bowl.
- Add 2 tbs white sugar, 2 ts yeast, ½ ts salt, 1 tbs vegetable oil, and stir it well.

- Add 2 cups of all purpose flour and mix it with a rice scoop, or by hand.

- Let the dough rise. It should sit with the lid closed at room temperature for 1 hour.
- After an hour the dough will rise to double its size. Knead it to remove the gas bubbles in the dough.


- Let it rise for another 10-20 minutes.
Make filling (for 8 hotteok):
- Mix ½ cup brown sugar, 1 ts cinnamon powder, and 2 tbs chopped walnuts in a bowl.
*tip: you could use mozzarella cheese for stuffing. Invent your own fillings with your favorite ingredients!
Let’s make hotteok!
- Knead the dough again to remove the gas bubbles.
- Place and spread about ½ cup flour on your cutting board.
- Put the dough on your cutting board and knead it. Make it into a lump, and cut it into 8 equal-sized balls.


- Take 1 dough ball, flatten it, put some filling in the center of the dough, and then seal it to make a ball.

- Repeat this 8 times to make 8 stuffed balls.
*tip: Use some flour from the cutting board to prevent your fingers from sticking to the dough - Heat up your non-stick pan over medium heat and add some vegetable oil.
- Place 1 ball on the pan and let it cook for 30 seconds.
- When the bottom of the dough ball is light golden brown, turn it over and press the dough with a spatula to make a thin and wide circle (about the size of a CD).


- Let it cook about 1 minute until the bottom is golden brown.
- Turn it over again and turn down the heat very low.

- Place the lid on the pan and cook 1 more minute. The brown sugar filling mixture will be melted to syrup!

Serve hot!
Green chili pepper pickles
This is one of my most favorite kinds of jangajji (Korean pickles). It’s made with green chili peppers and tastes salty, sour, spicy, and a little sweet. It’s very crispy and crunchy. Biting into a pickled pepper with a spoonful of warm rice and having the salty brine splash out with a snappy crunch is just irresistible for me. In general, chili peppers hold a special place in Korean cuisine and are loved by pretty much everybody. We use them in many many dishes.
These days, between summer and autumn, green chili peppers are in season. Peppers are cheap, plentiful, and at their peak, so I buy lots of them and make lots of pickles. I eat them with almost every meal!
I remember watching my grandmother make green chili pepper pickles when I was a kid. She made a few kinds: chili peppers pickled in a soy sauce brine, chili peppers pickled in a fish sauce brine, and also chili peppers pickled by pushing them deep into her crock full of homemade doenjang. I can still remember the taste of rice with my grandmother’s pickles.
This version I’m showing you today is one of the least salty varieties of gochu-jangajji that I know. I plan on posting more chili pepper pickle recipes over time, because they are so delicious and a good thing to have in the fridge when you want to put together a quick, tasty meal or even just a spicy snack.

Ingredients
- 1 pound green chili peppers, washed and dried
- 3 ½ cups water
- ½ cup soy sauce
- ¼ cup salt
- ¼ cup white vinegar
- 3 tablespoons sugar
Also get some pebbles, clean and dry them, and put them into a plastic bag.
Directions
- Cut the stems the peppers, leaving a ½ inch on the top

- Make a hole with a toothpick or fork on each pepper, just under the stem. These holes will allow the brine to seep into the pepper.

- Put the peppers into a glass jar that can hold at least 8 cups.

- Combine the water, soy sauce, vinegar, and the sugar in a pot. Stir to dissolve the sugar. Cover and bring to a boil over medium high heat. When the brine boils and bubbles vigorously on the surface, pour it into the jar of green chili peppers.


- Keep the peppers submerged in the brine by weighing them down with your bag of pebbles (or anything else handy).

- Cover and let it sit at room temperature for 24 hours.
- 24 hours later open the jar, take out the pebbles, and pour the brine out of the jar into a pot.

- Boil the brine vigorously for about 15 minutes.
- Remove from the heat and let cool thoroughly. If you want it to cool faster, place the pot into a bath of ice water but be sure not to splash cold water into the brine.
- Pour the cool brine back into the jar. Cover and refrigerate for 1 week or more before eating.

Three different ways to eat gochu-jangajji:
1. As a simple side dish with rice.
This is the easiest way to enjoy them. Simply put some peppers and brine in a shallow bowl, sprinkle some sesame seeds over top, and serve with rice. You can add more side dishes if you want.
2. Mixed with seasonings.
- 1 pound pickled green chili peppers
- 5 garlic cloves, minced
- ¼ cup hot pepper flakes
- 2 tablespoons soy sauce
- 1 tablespoon rice syrup
- 1 tablespoon olive oil (or vegetable oil)
- 1 teaspoon sesame oil
- 1 tablespoon sesame seeds
Combine garlic, hot pepper flakes, soy sauce, rice syrup, olive oil, and sesame oil in a bowl. Mix well with a spoon. Add the pickled peppers to the seasoning mixture. Mix well by hand. Sprinkle sesame seeds over top and serve it right away as a side dish for rice, or refrigerate it for up to 3 months in an airtight container.


3. Make bibimbap (aka mixed rice).
Chop 2 pickled peppers into small pieces and put them into a bowl. Add 1 minced garlic clove, 1 teaspoon hot pepper flakes, ½ teaspoon soy sauce, 1 teaspoon rice syrup, 1 teaspoons sesame oil, and 1 teaspoon sesame seeds. Mix well.
Roast a sheet of gim (seaweed paper) both sides very crispy.
Put a serving of warm rice into a large wide-mouth bowl. Add some or all of the chopped and seasoned mixture, crush the roasted gim and add it too. Mix well with a spoon and eat. You can add extra sesame oil, too.