4/27/17
Spicy braised tofu
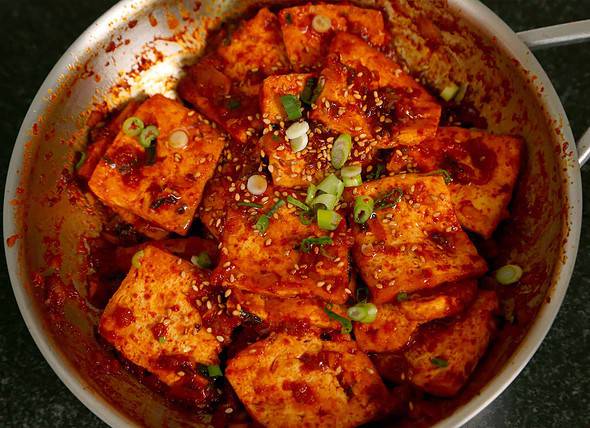
Today’s recipe is dubu-jorim (spicy braised tofu). It’s tofu braised in a savory-spicy sauce and pan fried with caramelized onion, garlic, and green onions, making it juicy, a little spicy, crispy on the outside and soft on the inside. It’s a delicious side dish for rice, noodles or porridge, and tastes meaty even though it’s a totally vegetarian dish.
This is something you can easily put together in a short amount of time that will please pretty much everybody, and especially vegetarians. You can refrigerate any leftovers for up to 3 to 4 days! This dish is good hot or cold, so you don’t even need to heat it up again if you don’t want to, just bring it out and serve.
Advertisement
It’s also a standard in Korean dosirak (lunchbox) item because it keeps well until lunchtime and it gives any meal a little kick. Enjoy the recipe!
Ingredients
- 1 package of tofu (18 ounces: 510 grams)
- 3 tablespoons cooking oil
- 1 teaspoon sesame oil
- 1 teaspoon sesame seeds
- 1 clove garlic, minced
- ½ cup minced onion
- 2 green onions, chopped
Advertisement
For the sauce, mix in a small bowl:
- 1 tablespoon soy sauce
- 1 teaspoon salt
- 1 teaspoon sugar
- 1 tablespoon hot pepper flakes
- ½ cup water
Directions
- Rinse tofu in cold running water and dry it with cotton or paper towel. Cut it into ¼ inch thick bite size pieces.

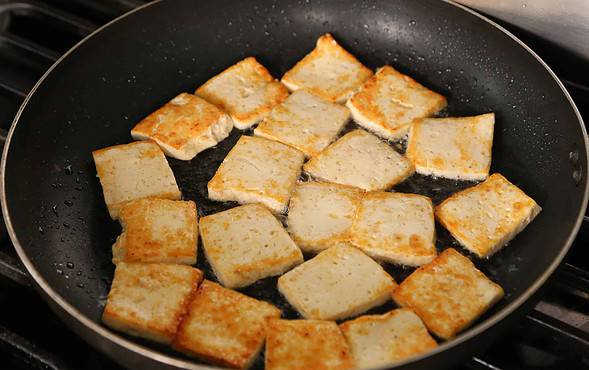
- Add the cooking oil to a non-stick pan and heat it up over high heat.
- Gently set the tofu onto the pan and cook for 7 to 8 minutes. Rotate the pan to cook the tofu evenly. When the bottoms get a little crunchy, flip them over one by one with a spatula. Let cook another 7 to 8 minutes until both sides of each tofu piece are a little crispy and golden brown.
- Transfer the tofu to a plate. Keep the leftover oil.
- Heat up a small pan over medium high heat and add the leftover oil.
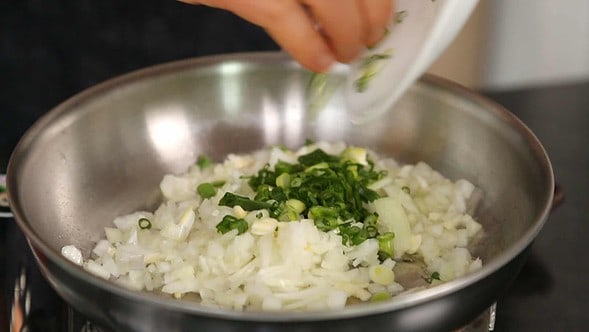
- Add chopped onion, garlic, and green onion (less 1 tablespoon, to be used for a garnish later). Stir with a wooden spoon for a few minutes until the onion gets a little crispy.

- Add the sauce and keep stirring until it reduces a bit and thickens.

- Add tofu and braise for a minute until the tofu absorbs some of the flavor of the sauce. Add some sesame oil and stir.

- Sprinkle some sesame seeds over top and the rest of the chopped green onion. Serve right away with rice.
Sweet & sour seaweed salad
Today I’m going to recommend you make this easy, chilly, healthy delicious recipe called miyeok-muchim or Korean sweet & sour seaweed salad. I don’t make this dish all the time, but on hot summer days I especially crave it. I always have dried seaweed in my pantry, so it’s pretty easy to put this salad together when I want to have it. There are all kinds of delicious things you can make with miyeok by the way, seaweed soup especially! If you don’t have a local Korean grocery store near you, it’s also available on Amazon.
The sweet, sour, tangy sauce in this dish mixed with the soft but crispy seaweed makes it irresistible and very refreshing. It really has the taste of the sea! It’s a perfect companion to grilled beef, so I love to make it when I have a BBQ. : ) It’s also a kind of mitbanchan, something you can keep in the fridge for up to a week, and keep eating it on the side for all kinds of meals during that time.
Advertisement
Let me know if you try it out! I’m sure you’ll love it!

Ingredients
- 1 ounce (30 grams) dried seaweed (miyeok)
- ¼ cup soy sauce
- ¼ cup white distilled vinegar
- 2 tablespoons honey (or sugar)
- 1 ounce onion (30 grams), sliced thinly
- 2 garlic cloves, minced
- 1 tablespoon sesame seeds
- 6-7 ice cubes (or 1 cup of shaved ice)
- salt (optional)

Advertisement
Directions
- Soak the miyeok in cold water 30 minutes to 1 hour until it fully expands.

- Bring a large pot of water to a boil. Add some salt (optional) and blanch the miyeok for 30 seconds, stirring occasionally with a wooden spoon.

- Strain and rinse in cold running water until the miyeok is nice and cold.
- Cut it into bite size pieces.

- Combine garlic, onion, soy sauce, vinegar, and honey in a bowl. Add the miyeok and mix well.

- Serve right away with rice or store it in an airtight container in the fridge, for up to 1 week. Right before serving, add some shaved ice or ice cubes if you want it extra cold.

Sesame peanut candy
Today I am introducing you to a delicious, sweet, crispy Korean dessert: a sesame peanut candy called kkae-ttangkong gangjeong. This is my version of a traditional Korean candy made with sesame seeds (called kkae-gangjeong) or peanuts (called ttangkong-gangjeong). I wanted to make these traditional candies more pretty, nutritious, and delicious so I combined them and added freeze dried strawberries and raspberries from an American grocery store.
The end result is sweet, crispy, light, delicious, easy to make and irresistible, especially when made with my homemade toasted sesame seeds. It’s not gooey at all: it’s a little brittle and breaks apart in your mouth, and the fruit gives it a tangy kick.
Advertisement
The recipe looks very simple but I actually spent a lot of time getting the measurements and the technique just right. This candy is not only delicious but it never goes soft or soggy, even if you leave in on the counter uncovered for a few days.
Try it out, and you can substitute peanuts or sesame seeds with either sesame seeds or peanuts, and you could experiment with other types of dried fruit, or just leave them out. The key point is to get everything ready before you make the syrup, because once that is ready and the nuts go in, you need to mix and spread quickly. Otherwise, the mixture will get hard in a few minutes, so it will be difficult for you to spread.
Try out the recipe and share it with your loved ones!
Ingredients
- 1 cup toasted sesame seeds (store bought or home-toasted
- 1 cup roasted unsalted peanuts
- ¼ cup freeze dried strawberries (optional)
- ¼ cup freeze dried raspberries (optional)
- 2 teaspoons vegetable oil
Advertisement


For the syrup:
- ½ cup sugar
- ¼ cup rice or corn syrup
- ¼ teaspoon salt
- 1 teaspoon water
Directions
- Put the sesame seeds and peanuts in one bowl and the freeze dried fruit in another.
- Spread the vegetable oil on the cutting board with your hand. Massage some into a rolling pin with the oil.
- Put the sugar, syrup, salt, and water in a small, heavy saucepan and cook over low heat.

- Let it boil for about 4 minutes until small bubbles come up around the edges of the pan. Don’t stir it, but lift the pan and tilt it so the syrup melt evenly.

- When the sugar is all melted, stir it with a wooden spoon. Keep stirring and lifting the wooden spoon in the air until you see sugar threads come off the syrup on the spoon.

- Add the sesame seeds and the peanuts to the syrup and mix well with the wooden spoon until it forms a big lump.
- Remove it from the heat and put the lump on the oiled cutting board. Quickly spread it out with the wooden spoon and add the freeze dried fruit.

- Roll it out with the rolling pin to a rectangle about 8 x 9 inches. Cut it into bite sized pieces about 2 x 1 inches with a sharp kitchen knife.

- Let cool and transfer to an air-tight container or plastic bag. You can keep it up to 1 week at room temperature and 3 months in the freezer.


Spicy bellflower root side dish
Hello everybody!
Today’s recipe is doraji-muchim. Doraji (known as “bellflower,” “balloon flower,” or platycodon in English) is grown wild in the mountains and fields of Korea. The root of the bellflower looks similar to ginseng root and tastes bitter with strong ginseng-like smell. It’s not only used to make delicious side dishes but it’s also used in Korean traditional medicine and home remedies.
You can make this dish with either fresh or dried doraji root. If you get fresh doraji, you’ll have to peel it and split it lengthwise into bite sized strips. Then soak the strips in salty water for a couple of hours, drain the water, rub them by hand, and rinse in cold water. Repeat this until they aren’t so bitter anymore. Taste a small sample of the root to test.
Advertisement
Dried doraji sold in a package is more convenient for making doraji side dishes because all you need to do is to soak the roots in water and rub them with a little salt to remove the bitterness. Then you can make delicious side dishes by mixing them with seasoning sauce, stir-frying, or making pancakes with them.
The most common side dish made with bellflower roots is doraji-muchim, so let’s start with this recipe. I’ll post more in the future. If you want to add cucumber, slice it and mix with some salt in a small bowl. Then squeeze out the excess water from the cucumber with a cheesecloth and mix with the bellflower root and the seasoning sauce.
Enjoy the recipe!
Ingredients (4 servings)
- 3 ounces of dried bellflower roots (about 85 grams)
- ¼ cup hot pepper paste
- 3 Tablespoons of hot pepper flakes
- 1 Tablespoon of soy sauce
- 2 Tablespoons of rice syrup or corn syrup
- 1 Tablespoon of sugar
- ½ teaspoon of salt
- 3 Tablespoons of white or apple vinegar
- 2 stalks of green onions, chopped
- 2 garlic cloves, minced
- 1 teaspoon of sesame seeds
- 2 teaspoons of sesame oil
Advertisement
Directions
- Soak dried bellflower roots in cold water overnight (for 8 to 12 hours) until the roots are soft.


- Drain and scrub with about 1 Tablespoon of coarse salt to remove the bitterness. Rinse and drain.
- Combine the hot pepper paste, hot pepper flakes, soy sauce, rice syrup, sugar, salt, vinegar, garlic, green onion, and sesame oil in a mixing bowl.

- Add the dried bellflower roots to the paste and mix it all together by hand.


- Sprinkle with sesame seeds and transfer it to a serving plate. Serve with rice, and the leftovers can be stored in the fridge for 3-4 weeks.


Spicy mixed noodles
I’m so happy to eventually introduce you to this recipe for bibimguksu. If you have a big party but you don’t have a big budget, I recommend this recipe, with the condition that the people at the party love spicy food.
I made these noodles for more than 30 people at Suzanne’s house in Rotterdam, when she hosted a meetup for me there. She made so many other Korean dishes to go with it, and people brought their own dishes, so we had plenty of food!
Advertisement
Suzanne and Reinier have their own wesbite called Koreaanskoken, where they translate my recipes into Dutch. If you can read Dutch, go take a look! They also have a Maangchi Hyve. If you’re Dutch and you want to find other Dutch-speaking Korean food lovers, you can find them at those websites!

“Ya ya ya! Let’s mix mix all!” : ) Susanne is mixing bibimguksu for 30 people!
The recipe is for 2 servings but you can use the same methods and techniques to prepare the dish for many more. Suzanne and I had fun at the meetup showing people how to serve so many guests. We had a huge amount of bibimguksu! You can feed a lot of people on a skeleton budget! Please let me know if you have a bibimguksu party with friends and family. Don’t forget to take a photo and send it to me.
Enjoy the recipe!
Ingredients
Thin noodles (somyeon), cucumber, egg, kimchi and kimchi juice, sugar, hot pepper paste, garlic, vinegar, sesame seeds, and sesame oil.

Directions (for 2 servings)
- Add ½ cup chopped kimchi, ⅓ cup kimchi juice, 1 clove of minced garlic, 1 ts sugar, ¼ cup hot pepper paste, 2 ts sesame oil, 1 or 2 ts vinegar, and 1 tbs roasted sesame seeds to a mixing bowl. Mix well with a wooden spoon.

- Hardboil an egg, cut it in half, and set it aside.
- Cut about ½ cup worth of cucumber into matchsticks and set aside.
Cook noodles:
- Add about 7 oz (200 grams) of noodles into a pot of boiling water. Stir them with a spoon to prevent them from sticking together. Close the lid.
- A few minutes later, they’ll start boiling over. Open the lid and stir the noodles. Cook a few minutes more with the lid open until they are cooked well.
*tip: You can tell if they are cooked by tasting one or two. The noodles are very hot, so add a few noodles to a small bowl of cold water to cool them down before tasting. The noodles should be chewy and soft.
- When the noodles are cooked, rinse them in cold water couple of times, strain them, and set aside. The noodles will expand and lose their chewiness as time passes, so the noodles should always be cooked last in this recipe, and then eat right away.
Put each portion of noodles on a serving plate and add the seasoning mix on top. Add cucumber and egg and serve.
One change that I would suggest when making this for a big group is that instead of preparing each dish separately, you can mix all of the noodles, seasoning mix, and cucumber together in a big bowl. Then portion some out for each person, adding some egg on top.

Advertisement
Rainbow rice cake
I’m going to introduce a beautiful Korean rice cake today. It’s called mujigae-tteok (무지개떡). Mujigae means rainbow, so my ancestors must have got the idea for the name from a rainbow! I love it! This is an example of how they incorporated natural beauty into their everyday life. Even though the name of the rice cake is “rainbow rice cake,” it is usually made with only 3-5 different colored layers. That’s why this rice cake is sometimes called “colorful rice cake” (색떡, saektteok).
In this recipe, I am using 5 different colors from bottom to top: brown, green, yellow, pink, and white.
Advertisement
This rice cake is made on special occasions like a baby’s 1 year old birthday, or a wedding. As you see in this video, making this rice cake takes a lot of effort and time, even though the ingredients are comparatively simple. However, if you make this rice cake for someone very special in your life, you wouldn’t care much about time and effort. : ) You may wish this while you’re rubbing the rice flour with your palms:
“I wish my baby becomes healthy, smart, and a good, warm-hearted person!”
“I wish my parents have healthy and long life!”
“To show my love for my lovely husband (or wife) !”
Leave a comment and let me know what you wish when you make this!
A note about short grain rice flour: the flour you buy at your local store or the flour you make may have more or less moisture in it than the rice flour I use in this recipe. This is because of many different things like how long it’s been in the freezer in the store, or the atmospheric conditions where you live. You may need to steam more or less, depending on how dry or wet your short grain rice flour is.
Cooking time: 1.5 hours
Ingredients
A 2 pound package of frozen rice flour (or make it at home), sugar, salt, water, liquid food coloring (green, pink, and yellow), lemon, mugwort powder (ssukgaru 쑥가루), cocoa powder.
Cooking utensils:
Steamer, sifter, 8 inch (20 cm) ring or springform.
Directions
- Thaw out frozen rice flour package and put it into a large bowl.
- Sift the rice flour.
- Add 10 cups of water in the bottom of a steamer, and place a wet cloth over the rack.
- Place the 8 inch cake ring in the center of the rack.

Brown layer (the bottom layer):
- Place 1 cup of rice flour in a medium sized bowl. Add 1 ts cocoa powder, a pinch of salt, 2 tbs of white sugar, and 4 ts of water.
- Mix it all up and press out any wet lumps by rubbing the lumps gently between your palms.
- Put the mixture into a sifter and sift into the center of the ring.
- Flatten out the mixture so it sits level in the ring.
*tip: a business card works well

Green layer:
- Place 1½ cup of rice flour in a medium sized bowl. Add a pinch of salt, 2 tbs sugar, and 1 ts mugwort powder (ssukgaru).
*tip: you can replace mugwort powder with green tea powder

- Put 2 tbs of water and 1 drop of green liquid food coloring into a small bowl and mix well.
*tip: Use a chopstick to get a very little amount of the food coloring - Add the green water to the rice cake mixture and mix it all up. Press out any wet lumps by rubbing the lumps gently between your palms.
- Put the mixture into a sifter and sift into the center of the ring.
- Flatten out the mixture so it sits level in the ring.
Yellow layer:
- Place 1½ cup of rice flour in a medium sized bowl. Add a pinch of salt and 2 tbs sugar.
- Put 1tbs lemon juice, 1 tbs water, and 1 drop of yellow liquid food coloring into a small bowl and mix well.
- Add the yellow water to the rice cake mixture and mix it all up. Press out any wet lumps by rubbing the lumps gently between your palms.
- Put the mixture into a sifter and sift into the center of the ring.
- Flatten out the mixture so it sits level in the ring.

Pink layer:
- Place 1½ cup of rice flour in a medium sized bowl. Add a pinch of salt and 2 tbs sugar.
- Put 2 tbs water and 1 drop of hot pink (fuchsia) liquid food coloring into a small bowl and mix well.
- Add the pink water to the rice cake mixture and mix it all up. Press out any wet lumps by rubbing the lumps gently between your palms.
- Put the mixture into a sifter and sift into the center of the ring.
- Flatten out the mixture so it sits level in the ring.

White layer (the top layer):
- Place 1 cup of rice flour in a medium sized bowl. Add a pinch of salt, 2 tbs white sugar, and 4 ts water.
- Mix it up and press out any wet lumps by rubbing the lumps gently between your palms.
- Put the mixture into a sifter and sift into the center of the ring.
- Flatten out the mixture so it sits level in the ring.
Now let’s garnish!

- On the top of the cake place 5 dried cranberries to make flower petals. Put a few pine nuts in the center.
- Cut a dried apricot into a thin strip, and place it as a flower stem.

Finally, let’s steam it:
- Close the lid of the steamer and bring to a boil for 30 minutes over high heat.
- Turn down the heat and simmer another 5 minutes.
- Take out the rice cake and let it cool down. Serve with tea or coffee.


Advertisement
Squash pancakes
I’m going to introduce these 2 kinds of Korean style squash pancakes to you today:
zucchini pancake and butternut squash pancake.
Unlike zucchini, butternut squash is an unusual ingredient in Korean cuisine. When I saw butternut squash for the first time in my life in USA, I asked my friend Jenny to give me her butternut squash recipe.
Advertisement
She told me that she usually cooked it in the microwave or in the oven with some brown sugar, butter, and cinnamon on top. I baked my butternut squash as she told me to, and it was very delicious! I found the texture, sweetness, and even the orange color to be almost the same as the squash that I used to make my hobakjuk in Korea!
Ever since then, buying some good quality of butternut squash in the fall is a regular seasonal activity for me. I stack them in the corner of my kitchen or living room. They are not only edible but also decorative!
My favorite squashes are: acorn squash, goblin squash, zucchini, and butternut squash.

Make your doenjangjjigae with acorn squash! It’s unbelievably delicious. : ) And bake a goblin squash in the oven with some honey, butter, and cinnamon. I love it!
Ok let’s start cooking!
Butternut squash pancake
Yield:
2 medium sized pancakes.
Ingredients
Butternut squash, salt, flour, vegetable oil.
This is very unique style of pancake because you don’t use water!
Directions
- Cut a butternut squash in half and remove the seeds with a spoon.

- Peel the skin with a potato peeler.
- Julienne the butternut squash.

- Place 2 cups of butternut squash strips into a bowl.
- Mix it with ¼ ts salt by hand, and set it aside.
- In abut 20 minutes the butternut strips will be a little wet due to the process of osmosis.
- Add 3-4 tbs flour and mix it slightly by hand or with a spoon.

- Heat up a pan with 1 tbs olive oil.
- Spoon half the butternut squash mixture on to the hot pan

- Spread the batter thinly, smooth it out with your spoon, and cook for a few minutes over medium heat.
- When the bottom of the pancake is lightly golden brown, flip it over.
- Keep pressing the pancake gently and add more vegetable oil to make it crispier.
- Serve it hot.

Zucchini pancake
Yield:
1 large pancake, for sharing.
Ingredients
Zucchini, salt, water, flour, sesame oil, vegetable oil.
I learned this recipe from my friend Heykyung’s mom, when I was in high school. I went to her house one day and her mother made this pancake for us. The taste was much better than any zucchini pancake that I had ever eaten. I found out the trick was just a little bit of sesame oil, in the right spot, at the right time! Actually her recipe used more flour and water, and a little bit of sugar in the batter. I modified her recipe to my taste by cutting down the flour and cutting out the sugar.
Directions
- Julienne a small zucchini. Put 1½ cups of zucchini strips into a bowl.

- Add ½ cup flour, ½ ts salt, ½ cup water and mix it well with a spoon.

- On a heated pan, place about 2 tbs vegetable oil and put the batter on to the pan.
- Spread the batter evenly and thinly to make a large circular pancake.

- About 1 minute later, when the bottom part sets firm, add 1 tbs sesame oil on the pan, along the edge of the pancake.
- Tilt and shake the pan so that sesame oil spreads underneath the pancake.
- Cook another minute until the bottom turns light golden brown and crispy.
*tip: keep pressing it down with a spoon or spatula while cooking - Turn over the pancake with a spatula, or flip it if you can.
- Add more vegetable oil if you want to make it more crispy. Cook for 1-2 minutes.
- Transfer the pancake to a large serving plate and serve with dipping sauce.

Dipping sauce:

- In a small glass bowl add 2 tbs soy sauce, 1 tbs vinegar, 1 tbs chopped onion, 1 clove of minced garlic, and 1 sliced green chili pepper.
- Mix it up with a spoon.
Advertisement