2/21/15
Squash pancakes
I’m going to introduce these 2 kinds of Korean style squash pancakes to you today:
zucchini pancake and butternut squash pancake.
Unlike zucchini, butternut squash is an unusual ingredient in Korean cuisine. When I saw butternut squash for the first time in my life in USA, I asked my friend Jenny to give me her butternut squash recipe.
She told me that she usually cooked it in the microwave or in the oven with some brown sugar, butter, and cinnamon on top. I baked my butternut squash as she told me to, and it was very delicious! I found the texture, sweetness, and even the orange color to be almost the same as the squash that I used to make my hobakjuk in Korea!
Ever since then, buying some good quality of butternut squash in the fall is a regular seasonal activity for me. I stack them in the corner of my kitchen or living room. They are not only edible but also decorative!
My favorite squashes are: acorn squash, goblin squash, zucchini, and butternut squash.

Make your doenjangjjigae with acorn squash! It’s unbelievably delicious. : ) And bake a goblin squash in the oven with some honey, butter, and cinnamon. I love it!
Ok let’s start cooking!
Butternut squash pancake
Yield:
2 medium sized pancakes.
Ingredients:
Butternut squash, salt, flour, vegetable oil.
This is very unique style of pancake because you don’t use water!
Directions:
- Cut a butternut squash in half and remove the seeds with a spoon.

- Peel the skin with a potato peeler.
- Julienne the butternut squash.

- Place 2 cups of butternut squash strips into a bowl.
- Mix it with ¼ ts salt by hand, and set it aside.
- In abut 20 minutes the butternut strips will be a little wet due to the process of osmosis.
- Add 3-4 tbs flour and mix it slightly by hand or with a spoon.

- Heat up a pan with 1 tbs olive oil.
- Spoon half the butternut squash mixture on to the hot pan

- Spread the batter thinly, smooth it out with your spoon, and cook for a few minutes over medium heat.
- When the bottom of the pancake is lightly golden brown, flip it over.
- Keep pressing the pancake gently and add more vegetable oil to make it crispier.
- Serve it hot.

Zucchini pancake
Yield:
1 large pancake, for sharing.
Ingredients:
Zucchini, salt, water, flour, sesame oil, vegetable oil.
I learned this recipe from my friend Heykyung’s mom, when I was in high school. I went to her house one day and her mother made this pancake for us. The taste was much better than any zucchini pancake that I had ever eaten. I found out the trick was just a little bit of sesame oil, in the right spot, at the right time! Actually her recipe used more flour and water, and a little bit of sugar in the batter. I modified her recipe to my taste by cutting down the flour and cutting out the sugar.
Directions:
- Julienne a small zucchini. Put 1½ cups of zucchini strips into a bowl.

- Add ½ cup flour, ½ ts salt, ½ cup water and mix it well with a spoon.

- On a heated pan, place about 2 tbs vegetable oil and put the batter on to the pan.
- Spread the batter evenly and thinly to make a large circular pancake.

- About 1 minute later, when the bottom part sets firm, add 1 tbs sesame oil on the pan, along the edge of the pancake.
- Tilt and shake the pan so that sesame oil spreads underneath the pancake.
- Cook another minute until the bottom turns light golden brown and crispy.
*tip: keep pressing it down with a spoon or spatula while cooking - Turn over the pancake with a spatula, or flip it if you can.
- Add more vegetable oil if you want to make it more crispy. Cook for 1-2 minutes.
- Transfer the pancake to a large serving plate and serve with dipping sauce.

Dipping sauce:

- In a small glass bowl add 2 tbs soy sauce, 1 tbs vinegar, 1 tbs chopped onion, 1 clove of minced garlic, and 1 sliced green chili pepper.
- Mix it up with a spoon.
Sweet pancakes with brown sugar syrup filling
Hotteok is a flour dough pancake filled with sugar syrup inside. It’s one of the most popular street snacks in Korea.
Ok, now it’s time for me to release my hotteok recipe!
I used to make hotteok for my children. How often? So many times! When they came home from school, I would surprise them with my hotteok. I never made it before they came. I prepared some well-fermented dough and the brown sugar mixture. That’s all! Once they entered the home, I said, “Wash your hands and come back to the kitchen! Hotteok will be ready~” with big smile. My children were so happy and excited!
A glass of milk and hot hot hotteok with sizzling golden syrup! Wouldn’t you like it? Yes, children love it! If you want to entertain your children, wait for them with the preparation just as I did.
I make hotteok for myself and my friends these days. Where are my little children!!
I sometimes miss the old times. They are already grownups and live far away from me.
Serve or eat hotteok right after you make it. If someone gives me cold hotteok, I will feel insulted. : ) I will refuse to eat it and save my empty stomach for kimchi and rice! lol
Ingredients:
Flour, water, dry yeast, salt, vegetable oil, sugar, brown sugar, walnuts, and cinnamon powder.
Directions:
Make hotteok dough:
- Place 1 cup of lukewarm water into a mixing bowl.
- Add 2 tbs white sugar, 2 ts yeast, ½ ts salt, 1 tbs vegetable oil, and stir it well.

- Add 2 cups of all purpose flour and mix it with a rice scoop, or by hand.

- Let the dough rise. It should sit with the lid closed at room temperature for 1 hour.
- After an hour the dough will rise to double its size. Knead it to remove the gas bubbles in the dough.


- Let it rise for another 10-20 minutes.
Make filling (for 8 hotteok):
- Mix ½ cup brown sugar, 1 ts cinnamon powder, and 2 tbs chopped walnuts in a bowl.
*tip: you could use mozzarella cheese for stuffing. Invent your own fillings with your favorite ingredients!
Let’s make hotteok!
- Knead the dough again to remove the gas bubbles.
- Place and spread about ½ cup flour on your cutting board.
- Put the dough on your cutting board and knead it. Make it into a lump, and cut it into 8 equal-sized balls.


- Take 1 dough ball, flatten it, put some filling in the center of the dough, and then seal it to make a ball.

- Repeat this 8 times to make 8 stuffed balls.
*tip: Use some flour from the cutting board to prevent your fingers from sticking to the dough - Heat up your non-stick pan over medium heat and add some vegetable oil.
- Place 1 ball on the pan and let it cook for 30 seconds.
- When the bottom of the dough ball is light golden brown, turn it over and press the dough with a spatula to make a thin and wide circle (about the size of a CD).


- Let it cook about 1 minute until the bottom is golden brown.
- Turn it over again and turn down the heat very low.

- Place the lid on the pan and cook 1 more minute. The brown sugar filling mixture will be melted to syrup!

Serve hot!
Sweet pumpkin rice
The Korean danhobak is a kind of winter squash, known by its Japanese name kabocha in English. In Korean, dan means “sweet,” and hobak means “pumpkin,” and bap means “rice,” so you could translate this dish as “sweet pumpkin rice.” A danhobak is very sweet and fluffy when cooked, so I often steam it and eat it by itself. The texture is very similar to sweet potato.
There are 2 ways to prepare danhobakbap. The first way is to mix rice with chunks of kabocha in a pot, and serve with a seasoning sauce called yangnyeomjang. The second way is to scoop out the insides of the kabocha, fill it with rice and other ingredients, and cook it.
I’m introducing the second version to you today because Halloween is coming soon, so I think you might be interested in making this beautiful and delicious danhobakbap with the kabocha pumpkin intact. If you take danhobakbap to your party, it will be popular because your friends will be excited to open the lid to see the colorful delicious looking rice inside!
Ingredients:
Kabocha (1½ kilograms, or about 3 pounds), sweet rice, black sweet rice, salt, jujubes, pine nuts, raisins, canned chestnuts, soy sauce, vinegar, green onion, green peas, and red chili pepper.
Directions:
Let’s make the rice first!
- Place 1 cup of sweet rice and 2 tbs of black sweet rice in a small pot.
- Add some water to the rice and scrub it by hand a couple of times. Rinse, and then drain the water. Repeat until the rice is clean and the drained water is mostly clear.
- Add 1 cup of water and a pinch of salt to the rice and close the lid. Set aside to soak for at least 30 minutes.

- After soaking, bring to a boil over medium high heat for about 5-6 minutes.
- Open the lid and simmer over low heat with the lid closed for 10 minutes.
- Add 1/3 cup of green peas to the hot rice and mix it up. Set aside.
Prepare the kabocha:
- Cut off the top to make the lid just like a jack o’ lantern.
- Scoop out the insides and set aside.


- Remove the pits from 8 dried jujubes. Measure 2 tbs raisins, 2 tbs pine nuts with the tips removed, and ½ cup canned chestnuts, and set aside.


- Place the jujubes on the bottom of the kabocha and add the cooked rice, the raisins, and the pine nuts, in that order.
- Add more rice on top to fill it out.
- Open a can of chestnuts and place them over top of the rice.

- Put the lid back on the danhobak and steam or boil for 30-40 minutes until it’s cooked thoroughly. Wrap it in cheesecloth beforehand so you can easily take it out when it’s ready.
- Make sauce by mixing 3 tbs soy sauce, 2 ts vinegar, 1 tbs chopped green onion, and 1 ts red chili pepper in a bowl.

How to serve:
- Open the lid of the kabocha and cut it into 4 pieces with a knife.

- Transfer each piece to a plate and serve with the sauce.


Enjoy the recipe!
Sweet red bean soup
Ingredients:
red bean paste, sweet rice flour, boiling water, sugar, pine nuts, cinnamon powder.
Directions:
- In a pot, place 1 cup of washed red beans and 4 cups of water and heat it over high heat for 10 minutes.
- Lower the heat to low medium and simmer for 50 minutes.
- Check if the beans are cooked fully. Remove extra water from the beans and crush them with a wooden spoon or use your food processor to grind it.
- Add 1 cup of brown sugar, 1 ts of salt, 1 ts of cinnamon powder into the red bean paste and set it aside.


- Put the red bean paste in a pot.
- Pour some water (about 4- 5 cups) and 1 cup of sugar (depends on your taste) and boil it.
- Mix one cup of sweet rice powder, a pinch of salt and 1 tbs of sugar in a bowl.
- Add 1/2 cup-1 cup of hot water in “3” and mix it with a spoon first and fold it by hand to make dough. (The amount of hot water varies depending on the dryness of sweet rice powder you use, so first use 1/2 cup of hot water to make your dough and put more hot water while kneading the dough)
- Make small rice balls with the dough about 0.5 cm diameter.
- When the red bean soup boils, add the rice balls and cook it.
- Keep stirring the soup and it will get thicker.
- Ladle the soup into a bowl and add a few pine nuts on top and sprinkle some cinnamon powder and serve it.
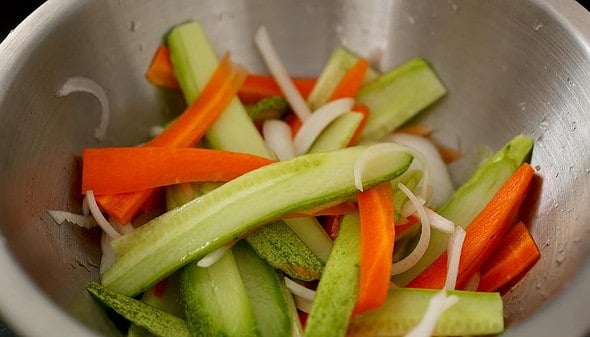
Sweet, sour, and spicy mushrooms with water dropwort
Today’s recipe is a sweet, sour, and spicy mushroom dish with water dropwort, called Beoseot minari chomuchim. It’s a variation of a popular traditional Korean dish that’s prepared the same way but uses squid instead of mushrooms (called ojingeo minari chomuchim), and something I came up with in my hotel room in Sydney, Australia during my Gapshida tour. I was making the squid version to bring to the Sydney readers’ meetup & potluck, and quickly whipped up this vegetarian alternative in case some people didn’t like squid.
To my surprise, most of the people at the party preferred my mushroom version to the original! I promised them I would post the recipe someday, and here it is!
I use king oyster mushrooms in this version, but you could use other mushrooms, too. Blanched mushrooms go well with water dropwort, the textures of each play off each other and both are awesome with this Korean-style sweet, sour, and spicy sauce. Water dropwort (called minari in Korean) can be hard to find, so you can substitute it with parsley leaves, or even basil leaves.
Enjoy the recipe and hello Australia! This is for you!
Ingredients (Serves 4 to 6):
- 1/3 an English cucumber, sliced in 3 to 3 1/2 inch long and thin strips
- ½ medium carrot, peeled, and sliced in 3 to 3 1/2 inch long and thin strips
- ½ a medium-sized onion, sliced thinly
- 1½ teaspoons salt
- ½ pound king oyster mushrooms (5 to 6 large king oyster mushrooms), cut into thin strips lengthwise
- 1 bunch of water dropwort (minari): about 2 ounces, with the tough stems and leaves trimmed off
- ¼ cup hot pepper paste (gochujang)
- 1 tablespoon hot pepper flakes (gochugaru)
- 2 garlic cloves, minced
- 1 tablespoon honey
- 3 tablespoons white vinegar
- 2 teaspoons sesame oil
- 1 green onion, chopped
- 1 green chili pepper (or jalapeno), stemmed, and chopped
Directions:
Prepare vegetables
- Combine cucumber, carrot, and onion in a bowl and mix with ½ teaspoon salt.
- Bring water to a boil in a pot. Blanch the mushrooms for 1 minute, then strain them with a strainer or a slotted spoon. Rinse them in cold water. Drain and squeeze to remove excess water. Put them in a mixing bowl.
- Reheat the water and blanch minari (water dropwort) for 30 seconds to 1 minute. Strain and rinse in cold water a couple of times, changing the water to clean them and to stop them from cooking. Squeeze out the excess water. Chop them into bite size pieces. Add to the mixing bowl.

- Squeeze out the excess water from the cucumber, carrot, and onion mixture and put it into the mixing bowl.

Make seasoning sauce
- Combine hot pepper paste, hot pepper flakes, garlic, 1 teaspoon salt, honey, vinegar, sesame oil, and green onion in a bowl. Mix well and add to the vegetables in the mixing bowl.

- Add green chili pepper and mix well by hand or a wooden spoon.


Serve
Transfer to a serving plate. Sprinkle with the sesame seeds and serve right away with rice. Leftovers can be kept in an airtight container in the fridge for up to 3 days.
Sugar candy
I was really surprised the first time one of my readers requested a recipe for ppopgi. I had totally forgotten about it!
When I was in elementary school in Korea, there was a ppopgi vendor outside my school every day, and I was forever tempted by him, so the request brought back a lot of good memories.
The ingredients can’t be simpler; basically just sugar and baking soda. The key to good ppopgi is all technique, timing, and patience. The candy is sweet, but also a little smoky, nutty, and bitter. You might expect it to be hard and sticky, but the baking soda makes it light, airy, and brittle. This candy has a few different regional names. When I was young, we used to call it “gukja,” which means “ladle” and refers to the ladle it was traditionally made in. It was only later that I heard it called “ppopgi” or “dalgona.”
When I was a kid, anything sweet made for an awesome snack for me and my friends. The ppopgi didn’t even have a stick; thats new technology! These days everyone is afraid to eat sugar, but back then we couldn’t get enough of it. Some of my friends even used to snack on sugar water!
After school we’d gather around the vendor and watch him melt the sugar, mix it up, add the baking soda, and make the candy. He had a few different patterns he used for the designs: a bird, a fish, a star, and a flower. And if you can eat the candy around the design without cracking it, you win a free ppopgi.
I always hoped he would firmly press the pattern into the candy and make a good strong impression that I could easily pop out, but he was so tricky. He only pressed it in for a quick second before wordlessly handing it to me. He didn’t need to explain the challenge: I knew what I was supposed to do. Preserve the shape in the middle and eat everything else. I used all kinds of techniques: nibbling, licking, pinching, but the surprising brittleness of the candy always beat me and it would shatter.
He sometimes let me clean his ladle, and I made sugar water like I show you in the video. I thought I was getting a real treat at the time!
Ppopgi is strictly a street food in Korea, but that shouldn’t stop you from making it at home and challenging your family members and friends to see if they can save the design without cracking. Try it and have fun! Let me know how it goes!
Ingredients:
- 1½ tablespoon plus 1 teaspoon white or brown sugar
- a pinch of baking soda

Sugar and baking soda
Directions:
- Place sugar in a stainless steel ladle and heat it over medium heat until it starts to melt.

- Stir it with a spoon so it melts evenly and doesn’t burn. Control the heat by lifting the ladle far from the heat or bringing it closer, as needed.
- Stir the melting sugar until it turns into a smooth, clear liquid with no lumps.

- Add baking soda and continue stirring. It will expand and change from light brown to creamy golden beige.


- Sprinkle 1 teaspoon sugar on a cookie pan. Scrape the hot, foamy candy from the ladle onto the sugar coated cookie pan.

- Place a skewer or lollipop stick in the center of the lower part of the candy, 1 inch from the edge.
- Press it down with any smooth, flat, non-stick object like a stainless steel bowl, lid, or a spatula.

- Use a cookie cutter to press a pattern into the center of the candy. Press hard and make a good impression if you want them to break out the design easily, and press softly if you want to drive them crazy!

- Wait for 1 minute until the candy gets hard. Enjoy!

I made a dozen of candies at the hotel where I stayed 1 night before the shooting day. : )

Thanks to everyone at YouTube LA Space for filming me there,
and a special thanks to Anthony Fantano!